Optional USB wiring

The access control and VTAP PRO readers come with cables fitted to suit their normal use. It is still possible to connect a micro USB cable as an option, by opening the case. You may want to do this during configuration, for instance if required to update firmware or configuration prior to connecting to VTAP Cloud over Ethernet.

If you want to disconnect the USB cable, for instance because you are using an I/O expansion board to provide power, you will also need to open the VTAP case.

To open the case follow the instructions in Choose a location for your VTAP reader.

Safety warning triangle icon CAUTION: We strongly recommend that power is disconnected before opening the VTAP100 case.

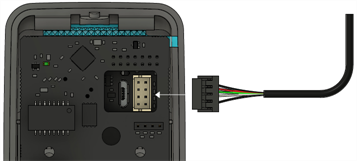
The USB connector is accessed through a cutaway in the daughter board, so you do not need to separate the boards. Use any micro USB cable to make the connection between the access control or VTAP PRO reader and a PC or USB power socket. Disconnect the micro USB or captive USB cable by pinching the connector and gently pulling it away from the socket on the board.

Diagram showing where to remove the captive USB connection, through cut away in daughter board

Captive USB connector accessed through cutaway in daughter board

Diagram showing where to make micro USB connection, through cut away in daughter board

Micro USB connector accessed through cutaway in daughter board

The cable can be routed out through the hole in the back of the VTAP case, when the product is reassembled. The back label includes a circular pre-cut section that can be pushed out to allow the cable to be passed though.
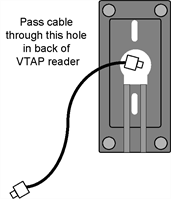
USB cable passing through hole in back of VTAP reader

USB cable passing through hole in back of VTAP reader